Wednesday, 29 February 2012

Stamps Using Plastic Cups and a Glue Gun.

I went to do an art lesson with my class the other day, and realized I didn't have any sun or moon stamps for my sun and moon stamping lesson!

Pinterest to the rescue! I don't remember specifics, but I recalled seeing something about making stamps with a glue gun. I grabbed some plastic snack cups, yanked the glue gun from the art cupboard, and 10 minutes later, we were ready to roll (AND I now had several sets of stamps, so more kids could do it at once!)


The steps are pretty straight-forward: Turn cups upside down, glue pattern on.

The clear cups were flat on the bottom, so they were easy. The dixie cups had a lip, so I had to add extra layers of glue to make sure it was raised above the lip.

I found it worked best if I did a layer of glue, let it harden, then went over it again with glue. If I tried to do more layers too quickly, the glue just spread out.

I then laid out some paint on paper plates, and they used them as regular stamps. I don't think ink would work well since it likely wouldn't stick to the glue properly, but you can try it!

Turned out as well as any other stamp kids use, I think! Would have turned out better if I'd taken more care to get the glue more even.

Once it dried, I added the poem we were learning that day.


Wednesday, 22 February 2012

Crayon "Stained Glass".

Using crayons to create beautiful window decorations.


What you need:
Crayons, cut up into as small pieces as you can (you only need about 2 full crayons per project).
Cardstock
Scissors
Iron (one you don't mind getting messy)
Wax paper
Newspaper
Stapler or glue

Lay newspaper out to protect your table, thick enough it won't soak through. Cut a piece of wax paper to size, and fold it in half.

Open up the wax paper.

Get out your cut crayons.

Spoon/arrange some cut crayons on one side of the wax paper, and refold it so the crayon pieces are sandwiched between the wax paper.
Put 1-2 pieces of newspaper over the wax paper and crayons. Iron until completely melted (you'll feel that it's flat).

Be careful, melted crayon tends to leak out.

Take off the newspaper, and remove the wax paper (be careful, it's hot).

Let cool and dry (it doesn't take long).

Cut out your shape from the cardstock, and staple or glue it to the wax paper.

Trim off excess wax paper.

If you're hanging it somewhere that both sides will be shown, attach another cut out of cardstock to the back.

And you're done!

Now hang it in the window.

Some other ones we did.

Monday, 13 February 2012

Tie-Dye Watercolour.

After seeing this post on Pinterest (everything starts on Pinterest!), I decided to change it a little to do as a Valentine's Day craft with my kids.

We simplified it, and did heart flowers.

The kids had such fun doing it, that we decided to try other stuff. We made stationary, and the kids wrote letters to people they loved.

Here's how we did it:

First, mix water and food colouring. Using a medicine dropper, squeeze little droplets all over your paper.

Then, iron directly onto the paper until just damp. Make sure to use an old iron you don't care about! Be careful, it splatters hot water as it heats. Before drying completely, inspect your work.

We decided it needed more green. We added more drops, and ironed again. 

This time, iron until completely dry (I found turning it over and ironing the back helpful too.)

We experimented with different patterns, like a spiral,

A heart,

And a butterfly...which we decided needed a face :).


We tried a variety of different things (including just sticking a bunch of stuff in the middle). The kids had a great time seeing how they turned out, and had fun writing on their stationary :).


Monday, 6 February 2012

Easy, Healthy, 3-step Fizzy Fruit Drink for Kids.

My husband buys these carbonated 100% juice cans, and my son loves them. One day, we ran out, and I had to improvise. Little did I know, I'd wind up inventing a drink he likes even better, that's much healthier for him!

Start with a jar of fruit baby food. I tend to go for the exotic flavours, fruit I wouldn't normally buy as whole fruit, to give him a variety.


Pour contents of jar into a cup. There's no measurements involved, just use a regular cup. Here, I've used a plastic cup.


Fill remainder of cup with low sodium Club Soda.


Stir and let your child enjoy! Don't let the paint-water look scare you off, it is (according to my 3 year old) delicious! 


Sunday, 5 February 2012

Weighted Blanket.

I found a tutorial on Pinterest for a weighted blanket, which sounded very neat! I wanted to make it more versatile, so I changed it up a bit. Her tutorial is much more helpful than mine, so if you want to do it my way, I suggest reading both tutorials!

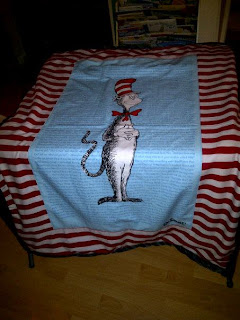
1) First, I took the Cat panel and added 6 strips of striped fabric I had laying around for a border.


2) I sewed a fleece back to it, but left the edges raw (instead of sewing inside out) to reduce bulk later on. This is where I should have stopped, that blanket was cute and easy :).


3) For the weighted part, I changed the original tutorial. The original says just sew with your 2 pieces of fabric, and use acrylic beads. I couldn't find beads, so I used rice, and I wanted it water resistant and removable, so I used two vinyl shower curtain liners.


4) I sewed a double seam around 3 of the sides, leaving the top open, then sewed vertical lines about 2-3 inches apart. Not gonna lie, this part sucked. Sewing vinyl is awful (especially when you accidentally get it caught in the thread cutter!)


5) Then I put a bit of rice into each column, shook it down, and sewed across horizontally. Repeat until you get to the top. You're supposed to do less rice in smaller squares, but at this point, I was frustrated, so I did more rice in huge rectangles. My blanket is noisy now :).


6) The machine left a few tiny holes, I got high tech and stuck some tape on them.


7) I made 8 loops and sewed them around the weighted insert.


8) I made 8 sets of 2 ties (one long one folded in half in each spot) and sewed them to the back of the blanket.


9) I pinned them down so I wouldn't accidentally sew them in the next step since I wouldn't be able to see them.


10) I took a fleece blanket and cut a piece to fit all but a bit at the top of the blanket, then sewed the 3 outside edges.


11) I took a smaller piece of the blanket and sewed the 3 edges on the top, overlapping the bottom layer.


12) After much wrestling with binding, I gave up and bought blanket binding. Even it got all waffled and awful, but at that point, I didn't care. I have since found a great tutorial for binding here. This is the blanket without anything in it.


13) The two layers on the back didn't stay closed well, so I added strips of hidden velcro.


14) To put the weighted part in, I first turned the blanket inside out.


15) Then I put the weighted insert on top of it, threaded the ties through the loops and tied them in knots.


16) Then I turned it right side out and attached the velro.


17) Done. It's made such that I can also put different combos of pillows inside it to make a lounger for him too.


18) How I'm sitting right now. Comfy.